Photo Tutorial: Back to Basics/Improving Our Photos

I'm limited to the few photos on my iPad right now, as I have a sleeping cat in my lap 😆, but I found one that was way to dark:
9997317B-0948-4A02-8E8D-D61C2E85CBB6.jpeg
I cropped it and played with the various sliders that come built in to the tablet's phone software, and was able to bring out a lot more detail:
70EDC205-C92F-4F99-A5BD-03ABCAAA1732.jpeg
 
Thank you for the participation! I enjoyed seeing all your photos!

I went back and added one more link geared toward beginners I feel like a lot may be able to relate to this.

@MarkBarbieri Thanks for the additional thoughts on editing. Always good to hear what you have to say!

as I used to point out to people in the local photography club, all pictures are edited in post-production. The decision is how much control you want of the process and how much you want to leave to the engineers that designed your camera.
I wondered if you could expand on this a little bit. So all cameras do some basic in-camera, programmed editing when we take pictures, is that correct? So you are saying that we can go with that, or we can go with a little more, or a lot more, right? It’s part of the creative process that we all use - knowing or not - when we take photographs. If I recall, each camera compresses an image a bit to turn it into a JPEG,, and there may be some other automatic edits for enhancing colors and such. We can choose to turn that function off and take responsibility for all edits ourselves, I believe. (That is what RAW is about - no edits at all.) I was unable right now to find a relatively simple article that explains all thIs. Could someone post one?

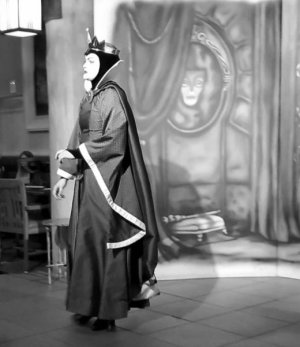
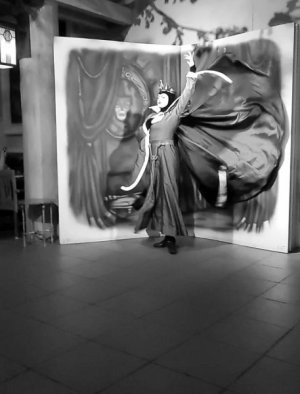
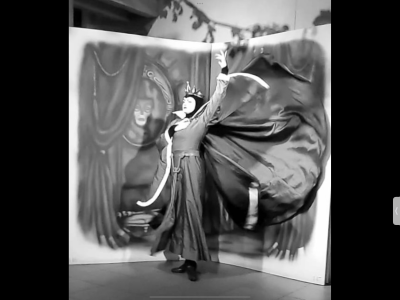
And a question for @kimmar067. I really like your Evil Queen photos! Nice work! Would you mind if I play with them a bit? :teeth: We’re all learning here and I think these would be really great examples, once again!
 
@MarkBarbieri Thanks for the additional thoughts on editing. Always good to hear what you have to say!


I wondered if you could expand on this a little bit. So all cameras do some basic in-camera, programmed editing when we take pictures, is that correct? So you are saying that we can go with that, or we can go with a little more, or a lot more, right? It’s part of the creative process that we all use - knowing or not - when we take photographs. If I recall, each camera compresses an image a bit to turn it into a JPEG,, and there may be some other automatic edits for enhancing colors and such. We can choose to turn that function off and take responsibility for all edits ourselves, I believe. (That is what RAW is about - no edits at all.) I was unable right now to find a relatively simple article that explains all thIs. Could someone post one?
I've run into many photographers that think that a picture "straight out the camera" has some special integrity to it and that working on the picture in post production is the photographic equivalent of embellishing. In the old days, these were usually people that always shot on Kodak Gold film and were oblivious to the fact that other photographers chose different film stock because each had its own particular look. Now days, it's people that shoot jpegs on their camera and leave all the settings on default.

The truth is that a modern digital camera doesn't capture reality. It records a bunch of brightness measurements in three different colors and then does a lot of work to translate those measurements into reality. Along the way, it applies a color space. It applies sharpening to the image. It performs noise reduction. It adjusts the white balance of the image. It adjusts the saturation.

If you are shooting in jpeg mode, your camera does this editing for you. It might allow you to set some parameters to control how it does all that stuff or the engineers that designed the camera may have preset the values for you. With my camera, I can set values for all of those things along with clarity, contrast, and color tone. Leaving the camera at its default settings doesn't mean not manipulating the sharpness, contrast, white balance, and other settings. It means using the default manipulations, which are probably designed to boost the contrast and saturation to make the image seem pleasantly vivid.

If you shoot in raw, you can make those same adjustments AFTER you take the picture. You can still leave them at default settings, but you have the freedom to adjust them based on how you want the picture to look. You could choose to make it look more like what you saw, more like what you wanted to see, or a way that best tells the story of what you saw.

Whether you adjust them or not, those settings are always applied at some level. There isn't a true "natural" setting because your camera doesn't capture reality. You can't turn off the white balance or color space. Either you pick or the camera picks, but something has to guide the process of translating measurements into colors. You could turn off sharpening, but the result will be an image that looks softer than reality. The truth is that digitally sampling an image or resizing it always causes a reduction in sharpness and so you should apply some level of sharpening when you capture the image and when you output it either to a smaller image to post online or send it to a printer. My point is that these are controls that you can use creatively or you can leave it to the choice of your camera designer, but the controls are an inherent part of the image capture process.

Maybe I can make my point clearer when talking about white balance. Imagine yourself sitting in a room that is lit with light coming in through the window and with light from an old incandescent lamp. The color of both lights is "white", but the light coming in through the window is a cooler shade and the light from the lamp is a warmer shade. Neither is right or wrong or more or less white. You can white balance your image so that the light from the window looks neutral, but that leaves things lit by the lamp looking orange. Or you could adjust the white balance so that things lit by the lamp look neutral, but that leaves things lit by the window looking blue. With a picture, you have to pick one or the other or a compromise of the two. When you are sitting in the room, your eyes adjust automatically as you look between the two, but your camera can't do that for you. So you decide when you take the picture or when you edit it later how you want to set the white balance.

The act of creating an image is inherently artificial. The question isn't whether you want "natural" or "edited" images. Your choice is whether you want to edit them or let designer of your camera edit them. It's convenience vs control, not reality vs imagination.
 
Here are some more examples of how I edit images.

I took these six images of the Anti-gravity Fountain at the Imagination pavilion. The challenge I had was that some areas were brightly lit and others were very dark. My eyes could easily adjust and I could see everything, but my camera couldn't capture what I was seeing very well. I took the same picture at different exposure levels.
i-V68F8Vb.jpg

Canon 7D, 24mm, f/8, ISO 100. Shutter speeds were 0.6s, 2.5s, 10s, 20s, 30s, and 30s. With the last two pictures, I opened the aperture to f/5 and then f/2.5.

Here is the blended image
IMG_9321_2_3_4_5_6_tonemapped-Edit-X2.jpg


Here's a shot I took of a dandelion in Rocky Mountain National Park. We had just finished a long hike and my wife and kids were napping in our tent. I decided to take some pictures around our campsite and noticed that the weeds looked interesting. I used my 70-200mm zoom with either a closeup filter or extension tubes (I can't recall which).
i-VHptFzc-XL.jpg

Canon 5D Mark III, 95mm, 1/500s, f/8, ISO 800

I purposely overexposed the picture using a technique called "exposing to the right". The idea is that your camera does its best job capturing brighter things. You get more noise in darker parts of your image. So if you can increase your exposure and not blow out anything in your image, you'll get a better picture that way. You just lower your exposure back down in post production.
i-54793W8-X2.jpg

I've processed this shot a few different ways, but this is the print I have on hanging in the house. I cropped it, lowered the exposure, increased the saturation (using Vibrance), and improved the contrast (using Clarity). I also added a pretty extreme vignette to make the dandelion pop more. I've done other versions were I de-emphasize the center section so that it is a picture about the fuzzy edges of the flower.

Here's a more extreme edit. Each fall, we set up our garage as a portrait studio for a couple of weekends and take pictures for friends, coworkers and neighbors. In this case, a family of three girls all put on their Halloween costumes. I took shots of each of them individually and then composited them into one fun group photo. I added some effects to complete the look. The floating child was held up by her ankles with a parent on each side. Then I edited out their hands on her ankles.
i-xxZZNCD-X2.jpg

Canon 5D Mark IV, 140mm, f/10, 1/160s, ISO 400. Shot with a giant softbox providing the key light. We used a white backdrop and some Thrifty White Tile board as flooring because I like the mild reflection it provides.

We've done a bunch of compositing shots. We've used snowy mountain pictures from our travels as backdrops when people show up dressed in winter cloths. We've done some fun composites with one child holding a miniature version of their sibling in their hand.

Here's another composited shot that I think turned out well. She's in the same outfit in each of the shots, but I adjusted the colors to give it a more interesting look.
i-x4Ghx5f-X2.jpg


Another fun compositing trick we do is to take pictures of kids holding an empty canvas, a black chalkboard, or something like that. We then add pictures to the canvas or write on the blackboard in post production. In this case, we took pictures of two brothers looking down at the blank canvases they were holding and then took pictures of them looking up. We mashed it all together so it looks like they are looking at the canvas. It is super easy to do in Photoshop.. You just copy the image destined for the canvas onto the other picture. You use free transform to fit that image to each of the corners of the canvas and set your blend mode to darken.

i-xQKLpnQ-X2.jpg
 
So creative Mark! I love the Antigravity Fountain and how you explained it. And the dandelion's clarity is amazing. Did you use Topaz for the clarity and vibrance?
 
So creative Mark! I love the Antigravity Fountain and how you explained it. And the dandelion's clarity is amazing. Did you use Topaz for the clarity and vibrance?
I used the clarity and vibrance controls in Lightroom. I think they all work roughly the same way. For anyone not familiar with these controls, clarity increases the mid-tone contrast and sharpness. It enhances the sense of detail and gives your pictures more of a sense of dimension. But like most controls, you can overdo it and leave your pictures looking crunchy.

Vibrance is very similar to saturation. They both make colors more intense. The main difference is that saturation works equally on all colors while vibrance doesn't effect already saturated colors as much. Both have their uses, but it is really easy to make over saturate your colors with the saturation control, making vivid colors look cartoonish. Since they added the vibrance control, I almost always use it instead of saturation. With either of them, you have to be really careful with skin tones. People love vivid colors, but when people's skin looks to saturated, we notice and it looks bad. Sometimes I'll boost the vibrance or saturation of an image and then use a local adjustment to tone down the skin tones.

I do that pattern - overall adjust balanced with a local counter-adjustment a lot. In a good picture, you usually want your subject to stand out. There are a lot of ways to do that. You can make them brighter. You can make the background appear out of focus. You can make them look sharper and more detailed. You can make your subject appear more saturated. Whatever helps guide your viewer to see what you want them to see.

Here's an example. With this picture, I wanted it to be about the three sisters. The flowers are lovely and make for a nice setting, but I wanted the focus to be on the sisters. I used negative clarity, which does the opposite of clarity, to make the flowers appear kind of dreamy and indistinct. But I wanted their faces to look crisps, I applied clarity to their faces to counter the negative-clarity and maybe enhance the contrast just a bit. That works on kids faces. Most adults benefit from some negative clarity on their skin (which is the purpose of some make-up).

I made a few other edits. I added a vignette to darken the corners and sides of the picture a bit to make the girls seem a little more glowy. I also did a little teeth whitening and eye enhancement. The girls blue eyes worked great with the flowers and their shirts. Everything was intended to make the girls stand out from their setting - lighting them with a softbox to make them brighter, using clarity to make the scene less distinct while leaving them crisp, using a vignette to further darken the setting while leaving them bright, and enhancing the details on their faces. It sounds like a lot, but I probably spent about 10 minutes working on the picture and I think it was well worth it.
i-PNPMdZW-X2.jpg

Canon 5D Mark II, 300mm, f/4.5, 1/200s, ISO 800
 
Just remembered this fun example of filling the frame. A coworker and neighbor and his four beautiful daughters were at our garage photo shoot. I wanted a picture that was filled with all four of their faces. I tried a few "normal" arrangements, like having the two taller sisters put their heads directly over the shorter sisters or trying them offset, but I wasn't happy with any of them. Then I had the idea of putting all four girls on the floor and shooting down on them. I had to climb a ladder and practically press myself against the ceiling to get the perspective I wanted, but it worked. For several years after that, people wanted the same shot with their family, but it never worked as well. I think it was because all four girls had similarly stunning eyes and similar and dark enough hair to make them stand out. The main takeaway is to be willing to get really creative when filling the frame.
i-b6sxz5G-X2.jpg

Canon 5D Mark II, 70mm, f/11, 1/160s, ISO 100

I have a fun story that includes that picture. I was brought in late to help with a project at work that was struggling. The mood on the floor was pretty tired with people weary of the high pressure grind on the project. There was very little sense of fun on the floor. Over the years, I had taken family photos of a lot of workers families, including the one above. My wife and I got permission from the parents and made about thirty 11x14 prints of children of current and former employees at the company and hung them on the walls in the halls of the floor. Then we had a contest to see who could correctly identify them. Because the parents worked in many different parts of the company and nobody knew all of them, people formed teams to work together to figure it out. It was a fun way to lower the tension and get people out of their offices. It also improved the atmosphere of the floor to have pictures of the children of employees in place of the typical boring corporate hall art.
 
Thank you for these amazing contributions to this thread, Mark! As always, you give us tremendous insight into some of the many things that are possible with post processing. All of your pictures are really stunning. How fortunate those families are to have you doing these shots for them! Great work.

I had kind of a funny story, too. Yesterday my daughter and I were in sort of heavy traffic (our usual) and we began talking about this thread and were reading some of the posts. I started talking about the exposure triangle to her as. even though I’d taught her basic principals years ago, I thought a little refresher might help pass the time. So she was sort of weaving in and out of traffic and dodging people and I apparently wasn’t “reading the room“ correctly because by the time we got to our destination, she was about to lose it! :lmao: There I was obliviously blathering on about aperture and shutter speed and iso while her blood pressure was steadily rising, he ha. We had a good laugh once I realized, and I’m still sort of chuckling about it today.
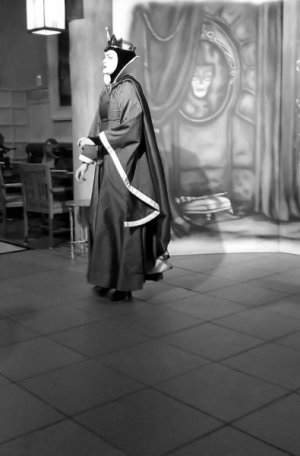
 
@kimmar067 Sorry for the wait. My work weekends get long and this one was no exception. I wound up with less time than I’d hoped I’d have.

I really liked your Evil Queen pictures! What was the back story on those, anyway? I don’t think I’ve ever seen her anywhere at the parks that I can recall.

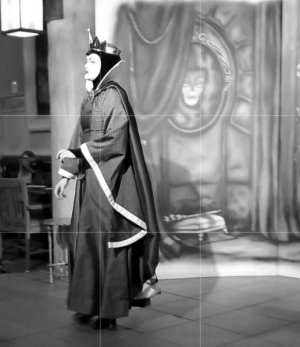
I thought I might be able to improve a little bit on the composition. Here’s what I got. Thanks for playing along, I think it’s really helpful to people to see these examples.

So, to recap, these are @kimmar067’s photos that I played around with, ie just some very basic editing. See if it makes a difference to some of the things we’ve talked about here, and please post your thoughts. We’re all learning.

Original

IMG_4491.jpeg

Tightened it up a little bit by cutting out some of the floor in the forefront as well as some of the clutter on the left side, leaving a closer image of the subject. (I’m betting that Mark and others could also easily make that lady on the left disappear, as well.)

IMG_4492.jpeg

Edit

IMG_4495.jpeg

______________

Original

IMG_4493.jpeg

Edit
This one I cut out the floor and straightened it a little. Loved the vines at the top So left those.
Leaves the viewer to focus solely on the subject.

IMG_4494.png

:goodvibes
 
One other thought I‘d mention about the Evil Queen photos to illustrate a point we’ve talked about here.

This is the type of situation you get the best photos you can at the time. If you’re using a phone, you may not be able to get in closer to the subject. You could have fun with a zoom lens if you had one but you may not. We don’t know how long the character will be standing in those exact positions, which are so classic for that particular character.

Another option, as the photographer - and I recall talking about this on other threads here in the past - could be to adjust your own position before taking the photo (if possible) in order to get this scene at a different angle thereby naturally cropping out people and other things you don’t want in your photo before you take your shot, if you can. Although, remember that Mark said here that he sometimes just keeps it all knowing he can adjust it later, too. The question then becomes, will you do the adjustments to enhance the photo if you leave it wide? Some photographers around here get OCD about fixing or improving each picture in great detail, but on the other end, some don’t fix at all. So maybe somewhere in the middle might be the key to improving those images we take daily. (This probably describes me, and a good deal of others here.)

That’s the whole idea behind this thread, really - improving our daily images since today, everyone is really a photographer because we have cameras with us constantly in one way or another and take pictures all day long, etc.

I think this all brings up a good point about the “getting it right in camera” vs the “I can fix it later” debate. Mark has made excellent points about the wonders that can happen when you master using the many tools of post-processing. It sure looks like a lot of fun if you care to get good at it. As I’ve said before, I’m on the “getting it right in camera” side. Neither is right or wrong, nor is one better or worse than the other, it’s all just about personal style and what we want out of the hobby of photography. But here is my point about this: understanding how to compose, or composition of a photo. helps all of us in taking good photos from the outset, regardless of the type of photographer we are. And that’s why we’re here. 👍🏻 I hope that some of this discussion has helped to that end.
 
Wow! Editing. Such a BIG range for this topic.


In-Camera Adjustments

I shoot in Raw, so there are only a few in camera adjustments that I play with.
  • White Balance - Changing the White balance in camera is not something I play with because it is so much easier to do that post.
  • Picture Style - I leave this as standard. If shooting in JPEG, it does impact on the colour rendering.
  • Colour Space - sRGB, which is also pretty standard.
  • Contrast - I tend to use spot metering to provide me with a higher degree of contrast in my images. I have been reading up on this metering mode; and think I will revert to evaluated for a while.

Post Processing
I have LightRoom, Photoshop, Skylum, Nik Collection (EFex range), Luminar4.

I kinda started with LightRoom. And then dabbled in Photoshop.
No, it wasn't always a case of 'go get the next shiny new toy'. It was a progression of freebies (Nik Collection) and cost splitting with another tog (Skylum).
Luminar4 and Skylum (despite the 50/50 split) falls in the category of 'bright shiny new toy'.

I pretty much stick with LightRoom and dabble a bit in Photoshop these days. Although, with the new masking tool in LightRoom, it's mostly LR.


LightRoom

LR was 'sold' to me as a photo catalogue management tool. Do I use it as photo catalogue? Yes I do. I do put in keywords as I import my images in and over the years, I've been thankful that I've been a little diligent with the keywords. If I need to find an image, more often than not, its the keyword find function that gets me to the images quickly.

Is it a photo editing tool? For me, absolutely.
All I want to do is do basic edits; and then fine tune a few of the images that I like.

Is it something that I use for creative photography? At this stage, no.
There are a whole bunch of extra features that Photoshop does that LR cannot do (yet).


Luminar4 and Skylum

Its a world of presets and single clicks with these.
I played a little in these and I find its a case of having to buy more presets as new ones come out to get the convenience and ease of single click editing.
I have to say that I rarely/never use these anymore.


Photoshop

So many features, almost impossible to know where to start.
I rarely go into PS because there are so many possibilities that I find I'm nearly paralysed by where to start.

What I've found with PS is that it is best to know what you want to do before even going into the program. Once I figure out what it is I want to do and edit in the image, then there is a whole world of short youtube vids that I can then hone it on and learn about that particular aspect of editing.

The trick is knowing what the edit feature you want to do in PS is called. :rolleyes1

I have the utmost respect for anyone out there who is a PS guru.
 
Editing in LightRoom

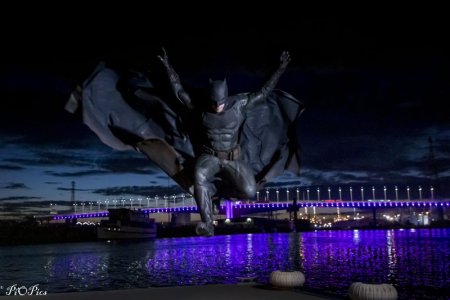
This is the 'as is' image downloaded from the camera into LR. My settings ISO 3200, 1/200, f/2.8.

As we shooting in the twilight (no lights) and the subjects were doing physical actions, I needed to balance the shutter speed so that I could capture actions at moderate speeds against the amount of light hitting the sensor to 'freeze the shot'.
The f/2.8 was a given. That's the widest my lens will go.
From experience, shooting with ISO 3200 is something that I know my camera can do and I can live with the additional noise in the image (and reduce it in post).
1/200sec might be a tad slower than I wanted but I still got the subject relatively sharp; with the cape showing the signs of it wasn't tack sharp.


Batman1 As Is.jpg


As I import images into LR, I have a 'basic edit' preset. Effectively the preset will do the following:
  • Highlights - 50
  • Shadows + 50
  • Vibrance + 5
  • Sharpening + 60
  • Lens Correction - remove chromatic aberration, enable profile corrections
That's my preset settings; and I'm sure any number of you will ask why do I have them set like that?
Well.....the short answer is that I attended a LR course at a local photo equipment shop and the teacher used those settings. I also later attended a local Canon Collective session and the person leading that session also recommended those settings.

Apparently, these are least detrimental settings when editing an image in post. At least that's what I remember the Canon Collective leader saying.

It seems like a good enough starting point as any.
For any images that I don't like after import, I pretty much just leave them alone at this point.


After the import, I will take a look at the image and then adjust the sliders accordingly. I know I'm supposed to expose the image correctly in camera; and I do look at the exposure meter and the histogram to check at the start of a shoot.
Checking the settings that I ended up with in LR, looks like I increased the exposure, plus played with the contrast, highlights, shadows and blacks. I also reduced the noise a little.

Batman2 Edits.jpg


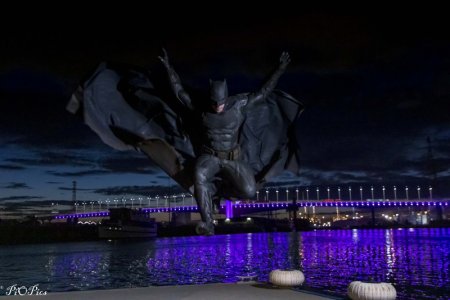
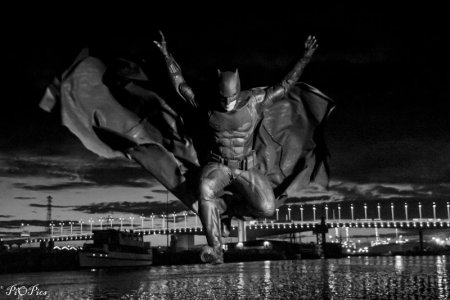
My final image was due to the cosplayer wanting to have this image as a black and white.
I cropped the image to remove the ballasts on the pier (I could have done this in PS); but the crop made the subject as the main feature and filled the frame a lot more.

When an image is converted to B&W, I dial up the contrast and blacks a lot more. B&W is a lot more forgiving on contrast and it seems to be enhanced by it.


Batman3 Final.jpg
 
Last edited:
Editing in LightRoom


Here's a shot in daytime that might show how some basic post editing can enhance an image. Well...it is subjective, but these are the photo enhancements that I liked. :)

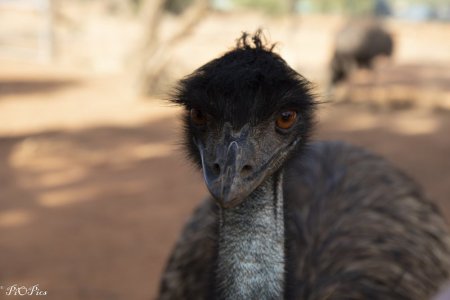
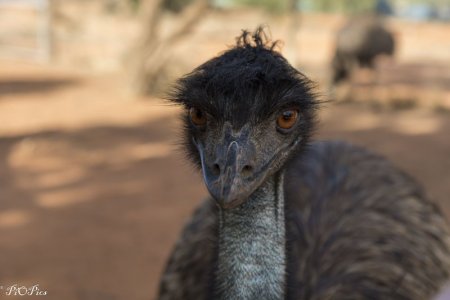
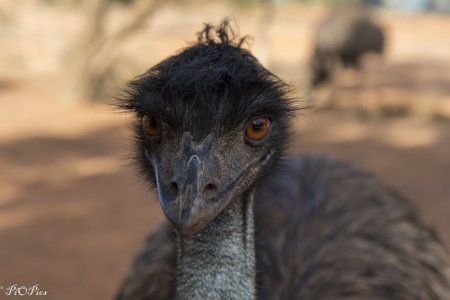
This emu was a resident of a 'resort' I was staying at.
This is 'As is' out of the camera.


Emu1 As Is.jpg


My basic edits as I imported the image into LR.
(highlights - 50
shadows +50
vibrance +5
sharpening +60
lens correction to remove chromatic aberration and enable profile corrections)


Emu2 Basic Edits.jpg


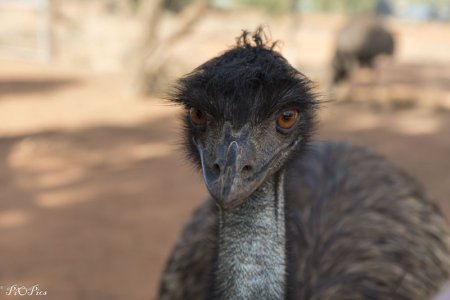
I went back to the image and hit the auto button in the Tone Panel. This is how the image turned out.

The main difference seems to be the exposure slider was dialled down to -0.29.

Emu2 AutoEdit.jpg


You may notice that I seem to have a flesh coloured blur in the bottom right hand corner. Yeah. I think my finger was in the way.
In PS, you can probably use content aware to remove it.
Like I said....I rarely go to PS, so it was easier to crop it out in LR.

Here's the image I landed with.


Emu2 Close Crop.jpg


I am a lazy post processor. I don't want to spend ages editing a photo.
With this work flow, the upload would have taken the longest. Then it was a single click for auto in the Tone panel.
Then a crop.

If you do have a photo editing tool, it might be worth having a play to see how you feel and whether you think it improves your images.
At the end of the day, it will come down to how you 'see' your photo.


princess::upsidedow
 
I think this all brings up a good point about the “getting it right in camera” vs the “I can fix it later” debate. Mark has made excellent points about the wonders that can happen when you master using the many tools of post-processing. It sure looks like a lot of fun if you care to get good at it. As I’ve said before, I’m on the “getting it right in camera” side. Neither is right or wrong, nor is one better or worse than the other, it’s all just about personal style and what we want out of the hobby of photography. But here is my point about this: understanding how to compose, or composition of a photo. helps all of us in taking good photos from the outset, regardless of the type of photographer we are. And that’s why we’re here. 👍🏻 I hope that some of this discussion has helped to that end.

I hope I'm not leaving the impression that post-processing needs to be complicated and difficult. It used to be. I had to learn some really funky techniques in Photoshop to get what I want. But things have gotten easier and easier and easier since then. With the artificial intelligence tools, things are getting even easier.

Take the example of wanting to remove something from a picture. Maybe it was a piece of trash you didn't notice when you took the picture. Or maybe it was someone standing in the background. In the old days, you would use the clone tool to copy bits from one part of the picture over the distracting part. You'd have to carefully align any patterns and make any necessary lighting adjustments. It could be hard and time consuming. Then the healing brush made small fixes easier. Then content-aware fill made it easier to have the tool handle the details. Now Photoshop has a tool that will do the replacement automatically using artificial intelligence with a single click.

25 years ago, technical Photoshop skills were an important part of advancing your digital photography skills. But the technical skills are getting less and less important leaving photographers more free to focus on their compositions. There has never been a better time to be a photographer than right now.
 
Echoing PrincessInOz, here are the digital tools I use the most.

Lightroom - When it came out, it changed my life. It used to take me all day to go through the pictures from a 2-3 hour photoshoot. With Lightroom, I could process them soooo much faster and it gave me a great catalog for organizing my photos. It is the only tool I use for 95% of my pictures. There are still some things that require a photo editor (like compositing parts from different pictures), adding text or graphics, and that sort of thing. But for most stuff most of the time, I do it in Lightroom.

The main competitors to Lightroom are Capture One, Dxo PhotoLab, Luminar, ON1 Photo Raw, and Darktable. Of those, Capture One seems to be the most popular and most people say that it does a better job of image processing than Lightroom does. I've never heard of anyone actually using Darktable.

Photoshop - It's an incredibly powerful tool, but it has a steep learning curve. I use less for photography now and more for digital art. Even though I use it less than Lightroom, when you need it, you need it.

It's hard to say that anything is really a competitor to Photoshop because it completely dominates the market. It has the most support in the form of training, plug-ins, etc. But CorelDraw still exists and some people prefer it. In the open source world, people tout GIMP, but I've never known anyone that uses it seriously. I've also heard of Affinity Photo, but I know almost nothing about it.

Cost - You can no longer buy Lightroom and Photoshop outright. You have to subscribe to them. Adobe has a $10/month package that includes them both. You can't get either cheaper by itself.

I've used a bunch of plug-ins over the years, with the Topaz plug-ins being some of my favorites. But over the past couple of years, I find that I rarely use them. Most of the problems they were created to solve can be done fair easily these days.

A lot of people sell presets for Lightroom. They are intended to make it quicker and easier to achieve certain looks. I've never found them useful, but a lot of other people love them.

I do use a Lightroom plug-in called Negative Lab Pro, but that's just for helping with photos of film negatives. And I also use a Lightroom plug-in to help me upload pictures to Smugmug.

For cellphone photography, I usually use whatever the default app is on my phone. I know I could use some fancy editing software on my phone, but I don't bother. If I want to edit the picture, I'll download it to my computer and do it there.

For video, I used Adobe Premiere for the last 20 years, but I recently switched to DaVinci Resolve. Premiere was $21/month compare with Resolve, which is free or a one-time cost of $300 depending on your needs. I was late to make the change because I have so much invested in knowing how to use Premiere, but just about everyone I know and everyone I follow online has already made the shift and it was hard to justify $252/year vs a one-time cost of $295. So far, learning Resolve has been painful, but not as bad as it was when I was learning Premiere. Anytime you think photo editing is hard, try working with video. Ugh.
 
I hope I'm not leaving the impression that post-processing needs to be complicated and difficult. It used to be. I had to learn some really funky techniques in Photoshop to get what I want. But things have gotten easier and easier and easier since then. With the artificial intelligence tools, things are getting even easier.

Take the example of wanting to remove something from a picture. Maybe it was a piece of trash you didn't notice when you took the picture. Or maybe it was someone standing in the background. In the old days, you would use the clone tool to copy bits from one part of the picture over the distracting part. You'd have to carefully align any patterns and make any necessary lighting adjustments. It could be hard and time consuming. Then the healing brush made small fixes easier. Then content-aware fill made it easier to have the tool handle the details. Now Photoshop has a tool that will do the replacement automatically using artificial intelligence with a single click.

25 years ago, technical Photoshop skills were an important part of advancing your digital photography skills. But the technical skills are getting less and less important leaving photographers more free to focus on their compositions. There has never been a better time to be a photographer than right now.
No, I think it’s great to see here what can be done, and that maybe your work, and the work of other posters, will inspire some to learn to take it up. My hope here was just for some very casual users to learn to use some basic skills with one of them being editing. I think most people have no clue how to use even the most basic editing software, from what I’ve seen IRL. So what I was saying in the part you bolded was just that it behooves all of us, no matter the skill level and whether or not we use pp, to strive to take good pictures from the outset using what we know about things like principals of composition. You and Princess and Kathy are certainly making the point that there are even lots more possibilities with photos for those who can learn some of the skills of post processing!

Maybe I’m not saying this right, lol. But please, carry on! :goodvibes
 
Last edited:

GET A DISNEY VACATION QUOTE

Dreams Unlimited Travel is committed to providing you with the very best vacation planning experience possible. Our Vacation Planners are experts and will share their honest advice to help you have a magical vacation.

Let us help you with your next Disney Vacation!


facebook twitter
Top